Sidebar

This login is provided for RiskEZI Docs administration.

  • Forgot your username?
  • Forgot your password?
RiskEZI RiskEZI RiskEZI
  • Getting Started

    RiskEZI Signup Instructions

    • Create a RiskEZI Site

    New User Instructions

    • Create a User Account
  • Index
    • Events

      Events Instructions

      • Creating Events
      • Manage Event Details
      • Modifying, Duplicating or Cancelling an Existing Event
    • Incidents

      Incidents Instructions

      • Incident Reporting Process
      • Suspected Child Harm
      • Incident Reports
      • Accident Reports
    • Risk Assessments

      Risk Assessments Instructions

      • Risk Assessments Summary
      • Process of Risk Assessment
    • Documents

      Documents Instructions

      • Storing Documents
    • Settings

      Settings Instructions

      • General Settings
      • Security
      • Risk Matrix
      • Help Guides
    • Campuses

      Campuses Instructions

      • Creating Campuses
      • Modifying Campuses
      • Deleting Campuses
    • Departments

      Departments Instructions

      • Departments Configuration
      • Create a New Department
      • Modify an Existing Department
      • Delete a Department
    • Users

      Users Instructions

      • Managing Users
    • Locations

      Locations Instructions

      • Location Listings
      • Create a New Location
      • Modify an Existing Location
      • Delete a Location
  • Tags
    • Settings
    • Risk Assessments
    • Incident Reports
    • Events
    • Campuses
    • Documents

Creating a new RiskEZI Organisation Site and Administrative Account

This is a step-by-step guide to creating a new organisation and administrative account for use with the RiskEZ platform.

When you enter the RiskEZ portal (https://portal.riskez.com/signup) you will be presented with the following fields.

Fill in the form details, including a prefix for your organisation's Site Address and click the button.

Your organisations secure RiskEZI site will be created and if successful, a green confirmation banner will appear at the top of the screen and you will be presented with the following fields to set up an administrative account.

The name of your organisation will appear above the RiskEZI logo and your email address will be the same as the one you entered on the previous page.

Enter a secure password for your administrators account into the password fields to create your administrative account.

After you click the Submit 
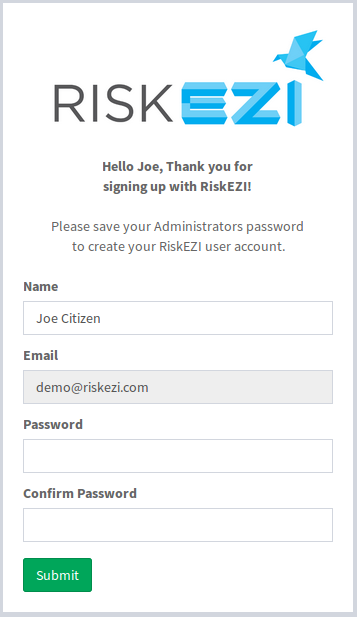
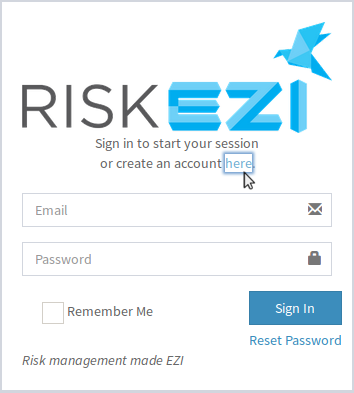
button, an activation email will be sent to your email address to confirm that you are authorised to use the email address provided. To activate your account you will need to open the email and click on the activation link. If needed you can request another email by clicking on the blue envelope that is shown on the image below.

You may now login to your administrator account using your email address and the password you just created.

Please follow these instructions to setup your administrative settings.

Settings - Administrative Instructions

Creating a new user account with RiskEZI

This is a step-by-step guide to creating a new user account for use with RiskEZI and configuring your user profile.

When you enter your RiskEZ site, you will be presented with the option to Sign In or Create an Account.

Click the link to create a new account.

Then fill in your Name, email address and a secure password. Then click the Submit button.

If Successful, a confirmation email will be sent to the email address you provided. Please use the activation link in the email to confirm that you are the account holder.

If you need to have the Activation Email resent, click on the blue envelope.

After you have activated the link in the email, your email address will be confirmed and your account will be pending approval from your administrator unless you have provided your own 'company' email address, as you should have automatic acceptance and will not require approval by the administrator.  If you require administrator approval, you will be notified by email once your company administrator has accepted your account creation.

Once you have received your registration acceptance, you can enter your email address and password into the sign-in form and click

The first time you log into your RiseEZI account, you will be prompted to configure your user profile.
Click on the prompt to proceed.
 
On this form you can select your Departments and Campus. Your may also click the 'Profile Image' button if you would like to upload your own profile picture.  In order to save you profile picture and any other details, you must click the Submit button.
 

Congratulations, you now have an active user account and are ready to start using RiskEZI.

Risk Assessment Instructions

Creating a Risk Assessment

Click “Risk Assessments” in the sidebar on the left side of the screen.

Add a Risk Assessment that you can later select in your Event/Section by pressing the + button in the upper right corner.

  • Title – As a recommendation, the title should start with the category (e.g. Game) and then the specific name to help find it for reuse. No Event specific title should be used here.
    • Examples:
      • Game-Balloon Dart Game
      • Swimming-Pool
      • Vehicle-Driving Personal Vehicle
  • Tag String – Supply tags to categorize your Risk Assessment for future use.
  • Notes – Specific notes to describe and instruct on the risk assessment activity.
  • Risk Matrix – Completing the Risk Matrix section of a risk assessment is not necessary if no hazard or risk is identified but must be completed if a risk or hazard is identified. Press the grey “+Add Row” button if a risk matrix is necessary.
  • Hazard/Risk – Write in the identified hazard or risk. Add additional Hazards/Risks by pressing the grey “+Add Row” button below. Remove additional Hazards/Risks by pressing the red “x” button on the right.
  • Without Control Measure – Carry out risk assessment without additional control measures (i.e. probability then severity). A risk assessment Class will appear upon completion.
  • Control Measure – Write in the control measures with consideration of hierarchy of controls. Read "Considering Risk Assessment" for more information.
  • With Control Measure – Carry out risk assessment with control measures consideration (i.e. probability then severity). A risk assessment Class will appear upon completion.

Press the Submit button to add your new Risk Assessment to your database.

View or Modify an Existing Risk Assessment

Click “Risk Assessments” in the sidebar on the left side of the screen.

Locate the existing Risk Assessment that you would like to work on by scrolling through the list view or using the filters located at the top of the screen.

Once you have located the Risk Assessment you would like to view or modify, double click on it or press the Magnifying Glass button.

  • Modify an Existing Risk Assessment – Click on the orange Edit button in the upper right corner if you would like to update or change details about your existing Risk Assessment.
Risk Assessments

The Process of Risk Assessment

Definitions

Risk Management: the process of identifying, assessing and controlling hazards, with follow up reviews establishing the effectiveness of controls.

Risk Assessment: performed prior to the commencement of an activity, when performing a new job or when new hazards are identified. Risk assessments must be documented.

Hazard: something with the potential to cause harm. This can include substances, plants, work processes and/or other aspects of the work environment.

Risk: the possibility that death, injury or illness might result because of the hazard.

Control Measures: measures put in place in order to eliminate or manage the exposure to identified risks.

Step 1: Identify the hazard

There are a number of general types of hazards, including:

  • • Work environment (such as confined spaces or working from heights)
  • • Energy (such as electricity)
  • • Manual handling
  • • Noise, plants & equipment
  • • Substances (such as chemicals)
  • • Type of activity may include hazards

Hazard identification can happen through:

  • • General supervision of staff and processes
  • • Formal auditing of staff, processes and systems
  • • Reviewing incident and accident reports
  • • Workers or contractors advising management of a hazard

Step 2: Assess Risk

The risk assessment should evaluate the scope of each identified hazard.

For each of the risks, estimate the likelihood and consequences of an incident occurring at your workplace, considering your assessment with and without existing control measures.

(N.B. RiskEZ provides an example of likelihood and consequence definitions along with the resulting risk matrix. Your organisation may establish differing risk definitions. You can find your organisation's risk matrix in the sidebar as "Risk Matrix.")
Evaluate the likelihood.
                                                                       Likelihood
  A   Almost Certain   Common or repeatedly occurring
  B   Likely   Known to occur or has happened in the past
  C   Possible   Could occur or has been heard of happening in the past
  D   Unlikely   Not likely to occur or has not been heard of happening in the past
  E   Rare   The chance of this occurring is almost impossible
Evaluate the consequence.
                                                                         Consequence
  1   Minimal   No time off work. No treatment required.
  2   Minor   Minor amount of time off work, injury or illness. First aid treatment required.
  3   Moderate   Moderate amount of time off work, injury or illness. Medical treatment required.
  4   Major   Incident resulting in serious bodily injury, dangerous event or death.
  5   Catastrophic   Incident resulting in multiple deaths or catastrophic loss of property.
Use a risk matrix to evaluate risk.
                                                                  Risk Matrix
 
         Consequence
      Likelihood
 1   Minimal   2   Minor   3   Moderate   4  Major   5      Catastrophic 
 A  Almost Certain         B        B            A        A               A
 B  Likely        C        B            A        A               A
 C  Possible        C        C            B        B               A
 D  Unlikely        C        C            C        B               A
 E  Rare        C        C            C        C               B
Using the ratings of each risk, develop control measures to minimise risk.

Revaluate risk levels after putting in control measures and then use the following procedure. This process may need to be repeated a number of times. Thinking about the implementation of control measures helps you consider the activity/hazard you are proposing.

After you have completed the process follow the below procedure.

  • Class A – Activity must not take place or work should stop.
  • Class B – This risk assessment must be seen by either WHS Manager, Business Manager or Campus Pastor before the activity takes place.
  • Class C – This activity can proceed with the control measures in place.

Step 3: Identify Control Measures

Hierarchy of controls

  • Eliminate
  • Substitute
  • Isolate
  • Implement controls

Step 4: Put Control Measures in Place

Communicate with team the control measures.

Conduct activity according to risk assessment.

Step 5: Monitor and Control

Review activity during and after and modify control measures as necessary.

Bootstrap is a front-end framework of Twitter, Inc. Code licensed under MIT License. Font Awesome font licensed under SIL OFL 1.1.